The Logitech F310 is a good quality basic game controller out in the market for about $16, so naturally it'd be the go-to controller for game testing.
After reading many (many) articles about using it for OSX game development, it seems like the consensus was that it's a plug and play controller and no drivers are needed for it to run as long as you're in Direct Input mode ("D" on the switch). The device shows up as "Logitech Dual Action" in the system profiler, so should work right?
It did not.
After a few nights of trying different forum tips, switching over to PC (which worked without a hitch), and even installing 3rd party utilities, it just didn't work.
I finally gave up and posted the question on the forum. A nice gentleman from Unity by the name of Jordi Bonastre gave me a simple suggestion for my dilemma: INSTALL THE LOGITECH DRIVERS.
After installing the Logitech Control Center, the F310 controller worked wonderfully.
I'm guessing the reason why it worked for some of the box, is because most people probably have Logitech Control Center installed for their keyboard or mouse already.
Saturday, August 1, 2015
Sunday, July 26, 2015
SOLIDWORKS: Replacing Reference Parts
Solidworks has a round-about way to replace referenced parts in part files. Instead of the logical UX decision of having this function in a context sensitive right-click menu, it's hidden in the dialog box when you open a file from the file menu.
I don't know about anyone else, but I usually just double click on my last project file.
I don't know about anyone else, but I usually just double click on my last project file.
- Go to FILE > OPEN
- Click to highlight the file with references that you want to replace
- Click "References..." box in the lower right hand corner
- Double-click on the filename box and select your replacement file
- Click Okay, then Click Open.
Source: Solidworks Blog
Thursday, January 1, 2015
3D Printing: Heat Shields for Larger Parts
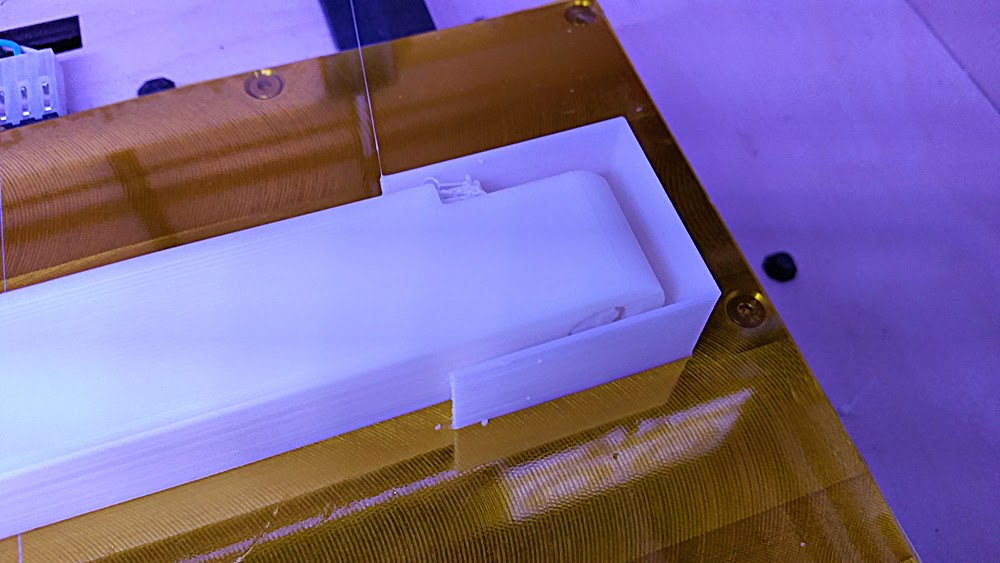
Not 100% sure where I read it first, but the idea of using a heat shield (technically a "draft" shield) really does work! Usually on my Replicator, a part that spans across the entire build platform will curl up on both ends.
However, using a 0.8mm thick heat shield (single 0.4mm shell all around), this client part came out perfectly straight. Also helped with the start and stop filament gapping that occurs with accelerated printing.

Monday, September 8, 2014
ZBRUSH: Delete Tool
It took a bit of Google searching for something as simple as this, but it turns out the only way to delete a tool from your 3D Meshes palette is to delete it in the SubTool menu. It's a bit counter intuitive considering all your subtools are nested under that tool / mesh, but once you delete all the subtools on that mesh, your tool has been successfully deleted from 3D Meshes palette.
Thursday, August 21, 2014
MAYA: Viewport 2.0
I've been living under a rock hidden in the deepest cave known to man, because I just discovered Maya's viewport 2.0. I've been so stuck in my ways in terms of workflow that I failed to notice this little gem hidden under the "Renderer" tab of my viewport.
What used to chug along at 3-5 frames a second is now blazingly fast thanks to what I can only imagine is GPU utilization. Wonder what other wonderful tool exists in Maya's toolbag that I've been neglecting... the possibilities!
https://www.youtube.com/watch?v=zJNF7CZ-VjI
What used to chug along at 3-5 frames a second is now blazingly fast thanks to what I can only imagine is GPU utilization. Wonder what other wonderful tool exists in Maya's toolbag that I've been neglecting... the possibilities!
https://www.youtube.com/watch?v=zJNF7CZ-VjI
Wednesday, August 20, 2014
ZBRUSH: ZProject Brush
The ZBrush ZProject brush just became one of the most useful tools for my 3D printing pipeline. I have an incredibly high detailed model of an engine that I have to make printable, with about 1.5 days of working time.
Naturally, I thought of ZBrush as my go-to toolbox for high poly mesh manipulation. Using the "ProjectAll" feature under the SubTool panel yielded rough results. There's just so much detail in the model that it requires a manual touch. In comes the ZProject brush.
Essentially, it's the manual version of ProjectAll, allowing you to manually push and pull the geometry to fit the "plug". Works almost like vacuum forming, and brought back fond memories of making aluminum foil clones of my Hotwheels cars, destined to by crushed by my RC car.
Tuesday, May 20, 2014
ZBRUSH: 3D Pixel Art
Accidentally stumbled upon a technique for creating 3D pixel art! Using a very low resolution 'Remesh' setting under the Subtools menu, it'll create something similar to this:
Subscribe to:
Comments (Atom)


